Callback configuration
When the callback feature is enabled, the user could dial an inbound route number and hang up after hearing the ring back tone or wait to be hung up by the system automatically. Then MyPBX will call the user via the trunk. After the call is get through, the user could dial the number he wants to call. If you would like enable the Callback feature, please configure as below:
- Select ”Internal Settings”->”Callback Settings”, and in the “New Callback” page, enter the number that is allowed to be called back, i.e. Callback Number.(e.g. 15960111111)
- Select “Inbound Call Control”-> “Inbound Routes”, and select “Yes” for “Enable Callback” in the Inbound Route editing page.See Figure 6-1:

For example, as the above figure, the trunk number is
It is because of the mismatch of signaling.
Please select
“Trunk”->”Analog Trunk”,
and change the value of “Caller ID Start” and “Caller ID Signaling” in the editing page.
- Please add a new inbound route for this SIP trunk alone and define ““DID number” ” to enable it match all DID numbers (i.e.: define the DID number as “.” which will match any remaining digits).
- If this SIP trunk has several DID numbers and different DID numbers called are supposed to be led to different destinations, please add different inbound routes for each of them. If the problem still exists after the configuration, please select
“Internal Settings”->”SIP Settings”->”Advanced Settings” and change the value of “To Field” to “To” .
- If this SIP trunk has several DID numbers and different DID numbers called are supposed to be led to different destinations, please add different inbound routes for each of them. If the problem still exists after the configuration, please select
Why can I make outbound calls but cannot receive inbound calls through my analog trunk?
In this case, please check if the analog trunk has been selected in Inbound Routes.
- If this trunk hasn’t been selected, please move it to the “Selected” box directly or add a new inbound route for it.
- If this trunk has been selected in the right inbound route, the problem might be caused by the mismatch of signaling. Please select “Trunk”->”Analog trunk” and change the settings of “Caller ID Start” and “Caller ID Signaling”.
About This Guide
Skype Connect™ provides connectivity between your business and the Skype community.
MyPBX helps you to connect to Skype via Skype Connect. By adding Skype Connect to MyPBX, your business could save on your communication costs with little or no additional upgrades required. Once the Skype SIP trunk is registered on MyPBX, you are able to make and receive calls on MyPBX through the Skype SIP trunk.
This guide has been tested with MyPBX U100 and describes how to connect MyPBX to Skype with Skype Connect.
Before you get started you will need
A Skype Connect SIP profile+ An internet connection with a public IP address+ MyPBX.

Figure 1 Connect MyPBX to Skype
1. Register Skype SIP Trunk on MyPBX
Before configurations on MyPBX, you need to set up a Skype Manager and buy a SIP profile from Skype. Please refer to Skype Connect Quick Start Guide to set up the SIP profile on Skype.
After setting up the SIP profile, take the SIP account to register on MyPBX.
Step 1. Create a VoIP Trunk. Path: PBXTrunksVoIP trunk
Fill in the Skype for SIP’s SIP profile details message in the pop-up windows.

Figure 2 SIP Profile on Skype Manager Page

Figure 3 Add VoIP Trunk
Provider Name: give a name for this VoIP trunk
Hostname/IP: sip.skype.com
Domain: sip.skype.com
User Name: Same as SIP User on Skype SIP profile.
Password: Same as Password on Skype SIP profile.
Save and apply the changes, and you will see the trunk status is “Registered” on “Trunk Status” page.
Step 2. Create an Outbound Route.
Path: PBX Outbound Call Control Outbound Routes
Route Name: SkypeOut
Dial Pattern: 0.
Strip: 0
Calls from Extensions: Select all.
Make Outbound Calls on Trunk: skypeforsip
As we can see from the Outbound Route of ‘SkypeOut’, all phone numbers starting with 0 will be go through this outbound route.

Figure 4 Outbound Route
Step 3. Make a test outgoing call
Call 001760-660-4690 to test audio quality and connectivity. It’s Skype’s echo test online number.
Note: If you want to receive inbound calls with Skype Connect, go to Chapter
2. If not, you have now successfully set up your Skype Connect to make outbound calls.
-
Configure MyPBX with Inbound Calling
-
Receive Incoming Calls from Skype Users
Step 1. Set up a Business Account to test inbound Calls from Skype.
- Create a new business account in Skype Manager. For more information on creating a new business account, please see the Skype Manager User Guide.
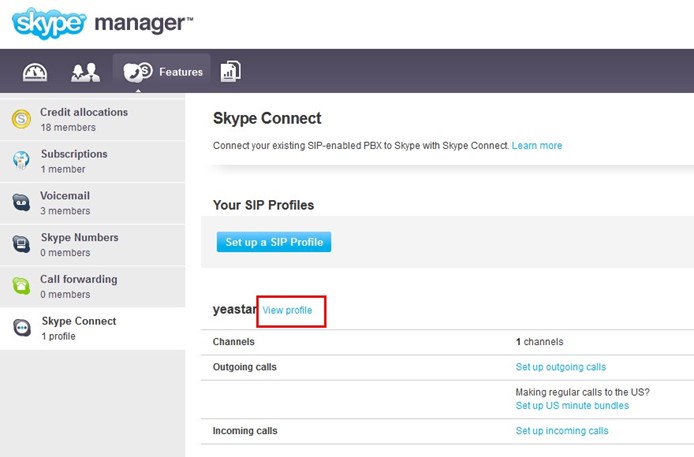
- Click View profile next to the name of the SIP Profile to which you want to add the business account.

Figure 5 View Skype SIP Profile
-
Click Set up incoming calls.
-
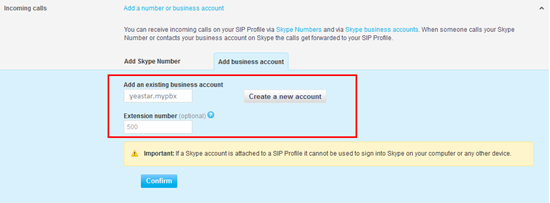
In the Add business Account tab, enter the newly created business account’s name and fill in the extension number which number will use to receive the call.
E.g.:
Add an existing business account: yeastar.mypbx Extension number: 500

- Click Confirm.
Figure 6 Add Business Account
Step 2. Set up the online number on MyPBX.
Path: PBXTrunksVoIP trunk Edit trunk ‘skypeforsip’
Online number: Fill in the extension number which one you configure in Skype Manger.

Figure 7 Configure Online Number
Step 3. Create Inbound Route for Skype incoming calls. Path: PBXInbound Call ControlInbound Routes

Figure 8 Inbound Route for Business Account
Route Name: SkypeIn
Trunk Sequence: skypeforsip
Office Hours Destination: Extension-500
Non-Office Hours Destination: Extension-500
As we can see from the Inbound Route of ‘SkypeIn’, all incoming calls will be sent to the Extension 500.
Step 4. Test the Call.
All calls from other Skype users to this account (yeastar.mypbx) will be routed to the extension 500.
-
Receive Incoming Calls from Land line or Mobile Phone
Step 1. Assign an Online Number to receive calls from landlines and mobile phones.
-
Click View profile next to the name of the SIP Profile to which you want to assign an Online Number.

Figure 9 View Skype SIP Profile
-
Click Set up incoming calls.
-
Click Buy a new number.

Figure 10 Add Skype Number
-
Complete the on-screen instructions to buy the Online Number. For more information on buying a new Online Number, please refer to the Skype
Manager User Guide.
Note: When you confirm your purchase, the Online Number is automatically associated with the SIP Profile.
Step 2. Set up the Online Number on MyPBX. Path: PBX VoIP Trunk Edit trunk ‘skypeforsip’
Online number: Fill in the Skype online number which one buy from Skype. E.g.: online number is 05925503309.

Figure 11 Configure Online Number
Step 3. Create Inbound Route for Skype online number incoming call
Path: PBXInbound Call ControlInbound Routes

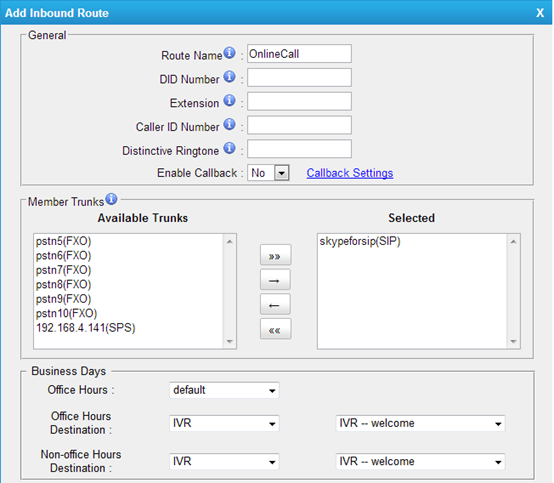
Figure 12 Inbound Route for Online Number
Route Name: OnlineCall
Trunk Sequence: skypeforsip
Office Hours Destination: IVR
Non-Office Hours Destination: IVR
As we can see from the Inbound Route of ‘OnlineCall’, all incoming calls will go to MyPBX IVR.
Step 4. Test the call.
When someone calls the online number associated with the SIP profile from a landline or mobile phone, the call will be routed to MyPBX IVR.
<End>
Why is the analog trunk always in busy status even when there is no call?
It results from the incorrect configuration of “Busy Detection”. Please log in the Web Configuration Panel and check if the value of “Busy Detection” is “yes” in the Analog Trunk editing page. (The default value is “yes”)
Why the phone screen displays “unknown” instead of Caller ID once the caller calls through the analog trunk?
It might derive from:
- The trunk doesn’t have Caller ID service.
To be able to confirm it, please connect the PSTN line right to the analog phone and call it via cellular phone to check if there is Call ID on the phone. If there is no Caller ID, please contact the service provider. - Wrong settings of “Caller ID Start” and “Caller ID Signaling” if the trunk has Caller ID service.
In cases like this, please change their settings. (Select “Trunk”-> ”Analog trunk”, and select the right type for “Call ID Start “and “Caller ID Signaling” in the editing page)
The extensions fail to make outbound calls or receive inbound calls. The admin logs in the Web Configuration Panel to check the problem, but the screen shows “502 Bad gateway”. After rebooting, everything goes OK, but the above problem repeats again a while later. What’s wrong?
Why do the inbound calls of a certain trunk would be hung up during a specific time period?
It is because that the system has enabled “Business hours” and the destination of “non office hour” has been configured to “End calls” in the inbound routes. Please follow the steps to change the settings:
Why does the callback function fail when pressing the “RD” button on the phone directly (the screen displays “unfound”)?
It’s because that the callee replaces its caller ID with English letters. When the “RD” button is pressed to call back, the phone will call the callee’s “Caller ID” directly. But MyPBX system recognizes the callee only by “Extension number ” rather than “Caller ID”. So the phone screen would displays
Why does the user always hear the prompt that”The number you dialed cannot be reached now, please leave the message after the tone” when calling a specific extension?
The problem might result from one of the following configurations:
- The extension has been set up “always transfer to voicemail”; the user can log in “User Web Interface” and uncheck the “always transfer to voicemail” option.
- The extension or the phone has enabled “DND” function.
- If it is the extension that enables”DND”, then it can be canceled by entering the feature code (the default value is”
Why does the user hear two beep sound first when taking the phone off the hook before hearing the normal dialing tone?
That’s because the extension has new voice-mails. Please dial the feature code
Why can’t the extension make outbound calls (to landline or cell phones)?
How to configure inbound routes?
Inbound Routes are used to determine the destinations of incoming calls of different time (i.e. office hour, non-office hour, and holiday). The steps of configuration are as below:
For more instructions, please refer to MyPBX User Manual.

How to configure outbound routes?
Outbound routes are used to determine the authority or dial pattern for the extensions to make outbound calls to cell phones and land-line phones, or make domestic long-distance calls and IDD calls.
How to connect and configure BRI trunk?
Every BRI module purchased will be supplied with a RJ45-RJ11 cable. (The RJ45 connector is to connect the port offered by BRI provider while the RJ11 part is for the BRI port of MyPBX. See Figure 4-1.)
Steps of configuring BRI trunk:
- Connect BRI trunk as the above instructions and log in the web interface (“Status Monitor”->”Line Status”) to check if the connection is successful. If the connection is successful, then the status will show ”OK”. If not, please select the right type of signaling that the service provider requires in the “Edit BRI trunk” page.
For example: The two numbers of the BRI trunk are 686867 and 686868. Then you can define two inbound routes (see Figure 4-2) to distinguish them.
After the configuration, the incoming calls from BriTrunk9 would reach MyPBX via two routes: BRIin1 (call the number 686867) or BRIin2 (call the number 686868).
How to register a VoIP trunk?
In the configuration page of “Trunks”, click
and enter the following information in the popup window. (Take the IMS trunk provided by Chinamobile as an example.)
Provider Name:
Hostname/IP:
Port: Domain: User Name: Password: From User: Maximum Channels: the number of the channels of each line you applied for (e.g.: 2) Caller ID: +86592111111–
How to add analog trunks?
- Power off or unplug MyPBX.
- Unscrew MyPBX, and open the upper case.
- Insert the O2 or SO module into the corresponding slot and place back the upper case and tighten the 4 screws. Then power on MyPBX and new analog trunks will be added successfully after rebooting.
How to change the extension number of FXS?
- Select the FXS extension to be changed and click “Delete”.
- Click “Edit”, and change the Extension number in the General section on the “Edit Extension” page.
How to change the default User Extensions range of MyPBX?
On the Menu bar of MyPBX, select
After firmware update Standard/Pro to the v2.17.0.23 log in failss
Why does it fail to log in on MyPBX web interface after updating MyPBX Standard/Pro to the firmware version 2.17.0.23?
In order to enhance the security of MyPBX system, the firmware version 2.17.0.23 of MyPBX Standard/Pro changed the encryption for the web GUI login.
What to do if the Web Configuration Interface of MyPBX shows “undefined”?
Retry after refreshing the IE web page; if the problem has not been solved, please delete the cookie and cache of the browser.
The way to delete the cookie and cache of the browser (Take IE browser as a example):
On the IE menu bar, select “Tools” –>”Internet options”, and select “general” on the pop-up window. Then Click the “delete” button of “Browsing history”.
The login information of MyPBX User Web Interface is as below:
IP address: same as MyPBX server
User name: Extension number (e.g.:501)
Password:
The default user name and password of MyPBX are:
User name: admin
Password: password
What’s the default IP address of MyPBX?
The default IP address is 192.168.5.150.


Prepaid and Postpaid Service
Prepaid and postpaid modes provide real-time billing and charging for extensions of MyPBX.
Prepaid service: the extension is recharged first, and call fees are deducted from the balance right after the call ends. When the balance reaches the limit credit, the system will automatically limit the extension from dialing out.
Q1. 1 The IP address of user’s PC and that of MyPBX are in different network segment.
For example: In company A, the IP address of the gateway is 192. 168. 1. 1 . The IP address of the user’s PC is 192. 168. 1. 10, subnet mask: 255. 255. 255. 0, gateway: 192. 168. 1. 1. Please note that the default IP address of MyPBX server is 192. 168. 5. 150
In this case, the user would like to change the IP address of MyPBX to 192. 168. 1. 200, which is in the same segment with the company network.
- Connect the LAN port of MyPBX to the Internet service via a cable and then power on MyPBX.
- Change the IP address of PC A to 192. 168. 5. 0 segment.
- Start-> Control Panel-> Network and Internet Connection-> Network Connection-> Local Area Connection, and double click it. (See Figure1-1)
Figure 1-1 - Click “Advanced”, and then click “IP settings”-> ”IP address”-> ”Add” (See Figure 1-2). In the popup window, enter an IP address with a same segment with MyPBX server (e. g.: 192. 168. 5. 61, but please note that this IP address shall not conflict with the IP address on the existing network), see Figure 1-3.
Figure 1-2
Figure 1-3
- Start the IE browser on PC A. In the address bar, enter the default IP address of MyPBX: http://192.168.5.150. Step. 4: Enter the user name and password when the login page appears.
Default user name: admin
Default password: password
- After login, please select the “Network Settings”? ”LAN Settings”. The LAN Settings page appears. (See Figure 1-4)
Figure 1-4 - Change the IP address on the “LAN Settings” page as below:
IP address: 192. 168. 1. 200
Subnet Mask: 255. 255. 225. 0
Gateway: 192. 168. 1. 1
Primary DNS: 192. 168. 1. 1 Then click “Save” to save the change. (See Figure 1-5)
Figure 1-5
- After clicking “save”, there appears the “reboot now” button on the screen. Please click this button to reboot the server in order to apply the changes.
- After successful rebooting, the User could enter http://192.168.1.200 in the IE address bar to login the MyPBX configuration panel.
- The change of default IP address is completed.


